As GPUs become the standard compute fabric for the enterprise, we’re hearing more questions around operationalization of workloads on Kinetica. For workloads which are unpredictable in terms of time, an always-on Kinetica instance makes complete sense. However, for workloads which have predefined compute intervals and are ephemeral in nature, you may want to prop up instances on demand and that might fit the bill. To do this effectively, you will need a pre-built orchestration layer that makes it effortless to bring up on-demand Kinetica instances as needed.
Many use Apache NiFi or Apache Spark for ingestion/ETL into Kinetica, and its architecture enables making these tools available along auto scaling groups. In this blog post, we will review the architecture which enables launching Kinetica on demand and the framework that enables you to build out a self-service platform for all your use cases.
To make Kinetica self service platform available, you can use Packer, Terraform, Consul, and Nomad. These tools are well integrated, allowing ease of operationalization. Let’s walk through each tool and how it enables this on-demand framework for Kinetica.
- Packer: Builds custom images. For the self-service framework, we will use an Amazon AMI which includes Docker, Nvidia-Docker2, core ancillary Linux libraries (i.e., wget), Consul, Nomad, and custom scripts.
- Terraform: Enables provisioning of infrastructure (multi-cloud/on-prem). For the self-service framework, we will use 3 AWS instances of Consul, and 1 of each: Nomad, Kinetica (P2 instance), Spark, & NiFi.
- Consul: Service discovery application. As you launch instances using Terraform, each service such as Kinetica will register itself to Consul. This allows users to be agnostic to the underlying deployment and focus on consuming services.
- Nomad: Application resource scheduler. If you are not familiar with Nomad, think of Kubernetes/Mesos/Yarn. Nomad seems to be lacking in functionality when compared to Kubernetes (i.e., resource scheduling for GPUs or over-provisioning of resources). Over time, this gap will close. Applications launched via Nomad make service discovery super easy through its native integration with Consul.
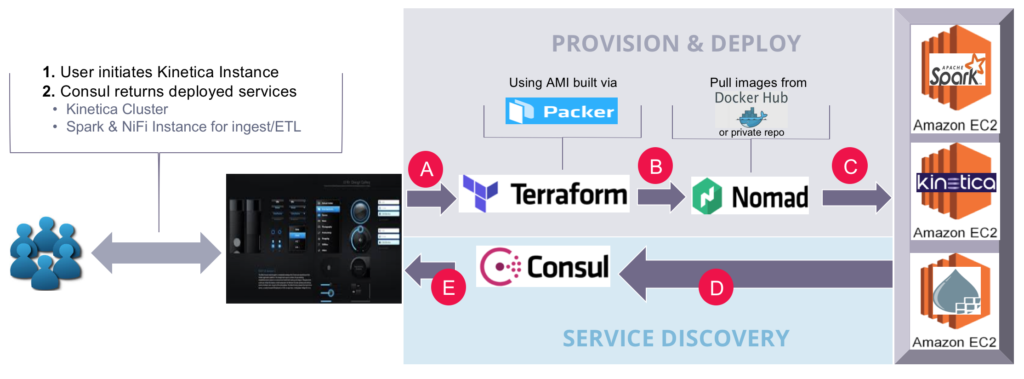
And here’s how the Kinetica self-service framework workflow works :

- A user, or group would initiate the Kinetica service through a UI. This would trigger Terraform to launch prebuilt AMI instances with Packer. (A)
- Once AWS EC2 instances are up, Terraform will begin provisioning each instance. Provisioning activities include installing Nomad and Consul. Additionally, Nomad provision scripts will be loaded to launch Docker instances of Kinetica, Spark, and NiFi. (B, C)
- Once Docker instances of Kinetica, Spark, and NiFi are running, Nomad will register each service to Consul. This enables users to grab IPs/ports of the provision instances and start workloads. (D, E)
To execute the Kinetica self-service framework yourself, we’ve made the repo available on github:
Here are the detailed steps on how to provision on Amazon:
- Download & Install Packer
https://www.packer.io/downloads.html - Download & Install Terraform
https://www.terraform.io/downloads.html - Download the Kinetica Self-service Framework Repo
https://github.com/sunileman/Kinetica-Self-service-Analytics - Create AMIs
- Create GPU AMI
- cd into Packer/nomad-consul-gpu-centos.json
- run packer build nomad-consul-gpu-centos.json
- This will return your custom AMI. Save this
- Create Nomad/Consul AMI
- cd into /Packer/nomad-consul.json
- run packer build nomad-consul.json
- This will return your custom AMI. Save this
- Create GPU AMI
- Update the following variables in variables.tf to match your aws environment. All the variable definitions are available in variables.tf
- aws_region
- ssh_key_name (This will allow ssh’ing into provision nodes)
- key_path (Path to ssh key)
- vpc_id
- aws_access_key
- aws_secret_key
- gpu_ami (ami id generated from step 4a)
- nomad_consul_ami (ami id generated from step of 4b)
- Run terraform init:
- Must be run inside directory which has main.tf
- Downloads all modules referenced insides main.tf
- Run terraform apply – Must be run inside directory which has main.tf
Within a few minutes, fully provisioned instances of Kinetica, Spark, and NiFi will be available. A few things to note:
- For this exercise, we have 1 Nomad server in a production deployment. It is recommended to have at least 3 (odd number). Additionally, the Nomad server script launches instances of Spark and NiFi. In a production deployment, it’s best to have this initialed from the external call.
- Kinetica will launch using native Nvidia-Docker runtime and not Nomad. Nomad does not have GPU scheduling like Kubernetes. Nomad offers a “custom resource” definition; however, this is a stopgap “feature” until this has a first-class GPU scheduler.
For service discovery, go to the Consul UI to get information about Kinetica, Spark, and NiFi. Consul UI is located on any consul_server:8500/ui.
The main Consul page displays all services available. Kinetica, Spark, and NiFi are available:
To find the IP and port Kinetica is hosted on, click on the Kinetica service tag:
Kinetica URL and port are shown:
Here is the Kinetica service provisioned by Terraform and exposed via Consul:
To find the IP and port Apache NiFi is hosted on, click on the NiFi service tag:
Kinetica URL and port are shown
Here is the NiFi service provisioned by Nomad:
To find the IP and port Spark is hosted on, click on the Spark service tag:
Here is the Spark instance provisioned by Nomad:
A quick view of Nomad’s UI shows current NiFi and Spark containers:
In this blog post, you learned how to enable the Kinetica self-service framework using Packer, Terraform, Consul, and Nomad. This framework comes with popular tools such as NiFi and Spark to perform ETL and massive parallel ingestion. Exposing Kinetica, Spark, and NiFi as a service for ephemeral workloads enables business agility while maintaining a manageable TCO in the cloud.

